IMPORTANT:
Proceed at your own risk. We're not responsible for you blowing yourself or your gun up
Blank Adapting the M1917A1 Watercooled Machine Gun
Date Written: November 2011
Author: Chris Guska
Blank Adapting the M1917A1 Watercooled Machine Gun
1.) Selecting blanks
2.) Feedway modifications (You are here)
3.) BFA Construction
4.) Gland Packing
5.) Belts vs Links
6.) Feed parts
7.) Troubleshooting
2.) Feedway Modifications
This is probably the most critical aspect of blank adapting the 1919a4 to achieve reliable results. Regardless of 30.06 vs 308, belts vs links, booster modifications or anything else - it simply doesn't matter if the cartridge isn't held in the feedway to allow the extractor pawl to grab and pull the round.
If your feedway is not setup right, everything else wont matter. There are 2 major things here with regards to blank adapting (Feedway and Cartridge stop). Also a minor point (holding pawl tension) to help with reliability.
1.) Feedway adapters - Basically you want to fit these inserts to your blanks and gun such that the blanks do not have any forward / back wiggle room in the feedway, but will slide side to side smoothly.
When the bolt / extractor arm comes forward on the feed cycle, the arm will push the blank forward unless it is firmly held in place so it has no where to go. The extractor arm needs to "snap over" the rim (extractor groove) of the blank.
Having a good fit front to back of the blank in the feedway is critical to reliable feeding and operation. This is where many people fail. You may need to fit feedway adapters to each "type" or "brand" of blank that you use. Not all blanks are the same overall length.
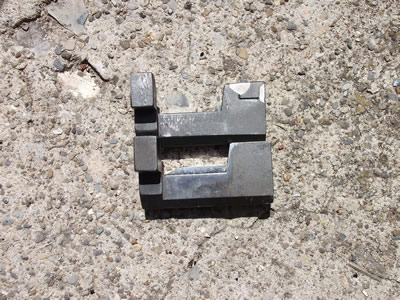
For 308 blanks - modify the front cartridge stop by welding a wide bead onto the stop, then draw filing to fit, or welding a piece of sheet metal to fill the gap. For maximum reliability, this should be fitted such that the blank can travel across the feedway freely, not binding, but have very little lateral play.
Unmodified Front Cartridge Stop Top, Modified Front Cartridge Stop Bottom
For 30.06 short crimp blanks - purchase a USGI 30.06 blank cartridge stop. This stop can be fitted to the blanks much as was done with the Israeli 308 front cartridge stop.
2.) Right Rear Cartridge Stop - There are two options here. The 30.06 rear stop and the "Israeli 308" rear stop. If installed (permanently riveted usually) - the 30.06 rear stop will only allow you to shoot 30.06 out of the gun. The 308 rear stop will allow you to shoot 308, 8mm and 30.06. Depending on the 30.06 blanks you are using, the 30.06 rear stop may be problematic.
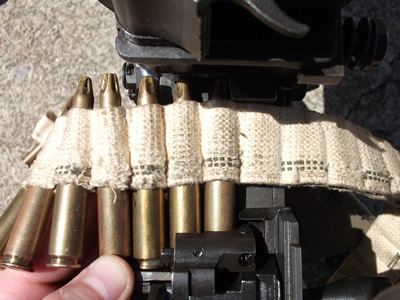
The issue is that the 30.06 is wider, and restricts the "ejection" side of the feedway. It narrows the window so that it is only wide enough for the belt to slide through, provided that the belt is seated at the "correct" depth. If the seating depth isn't right, or the blanks aren't quite positioned correctly - it causes the belt to angle and bind on the rear stop resulting in jamming or retarding of the feed.
While the 30.06 rear stop is the "authentic" part, having the 308 rear cartridge stop installed is the most advantageous for blank firing use. The 308 rear stop is much narrower, providing a larger "ejection" side window on the feedway. This larger window is much more forgiving on belt seating depth as well as cartridge position in the feedway.
1917a1 Watercooled with 308 Right Rear cartridge stop installed. Note the additional space on the right side of the feedway to allow the belt or links to clear. If a 30.06 rear stop was installed, the gap below the belt would be filled - having a fairly narrow path, possibly restricting the clear ejection of links or the belt.
3.) Belt Holding Pawl - Regardless of whether your gun has a narrow 30.06 or wide 308 belt holding pawl the gun will work with any caliber ammunition, provided that the spring tension is correct. I've found that many 1919's and 1917a1's have issues initially with the belt holding pawl spring / or the belt holding pawl spring hole.
Start by removing the belt holding pawl pin and belt holding pawl from the bracket. The pin simply pulls out with a pair of pliers. Remove the spring and check it for dirt / dried grease or any kinks. Clean the belt holding pawl spring hole and check for burrs and free travel of the spring. Often times the spring is covered in dried grease and dirt, or the hole is filled with crud, not allowing the spring to freely compress.
Re-install the belt holding pawl and pin then test the pawl by pressing down on it with your thumb. it should travel up and down freely and depress without excessive force. It should not hurt your thumb to press down on unless you have sissy hands. The force required to depress the pawl is difficult to describe, other than "medium". It should not be difficult to press down.
Some kits came with "extra heavy" springs from the israelis. Either cut one or two coils off the spring and try it or junk the spring and get a "Century Spring Co. C-500 coil spring" (5/32 x 9/16 x .023 / .156 x .562 in decimal, with .023 music wire)
90th IDPG Projects


